Bulk Add and Delete Google Workspace User Email Aliases
SheetOps Google Sheets Add-on
This guide is for the official SheetOps add-on. Install it to manage Google Workspace at spreadsheet speed.
Bulk user email alias management in Google Workspace refers to adding or removing secondary email addresses for multiple user accounts simultaneously. While the native Google Admin Console requires manual one-by-one adjustments in individual user profiles or complex API scripting, SheetOps allows administrators to manage and sync user email aliases in bulk directly inside a Google Sheets spreadsheet.
Managing aliases in bulk is a common administrative task during company rebranding, mergers, or department reorganizations. While manual entry for 50 users in the Google Admin Console can take up to 30 minutes, SheetOps reduces this to under 2 minutes.
Understanding User Email Alias Diff-Syncing
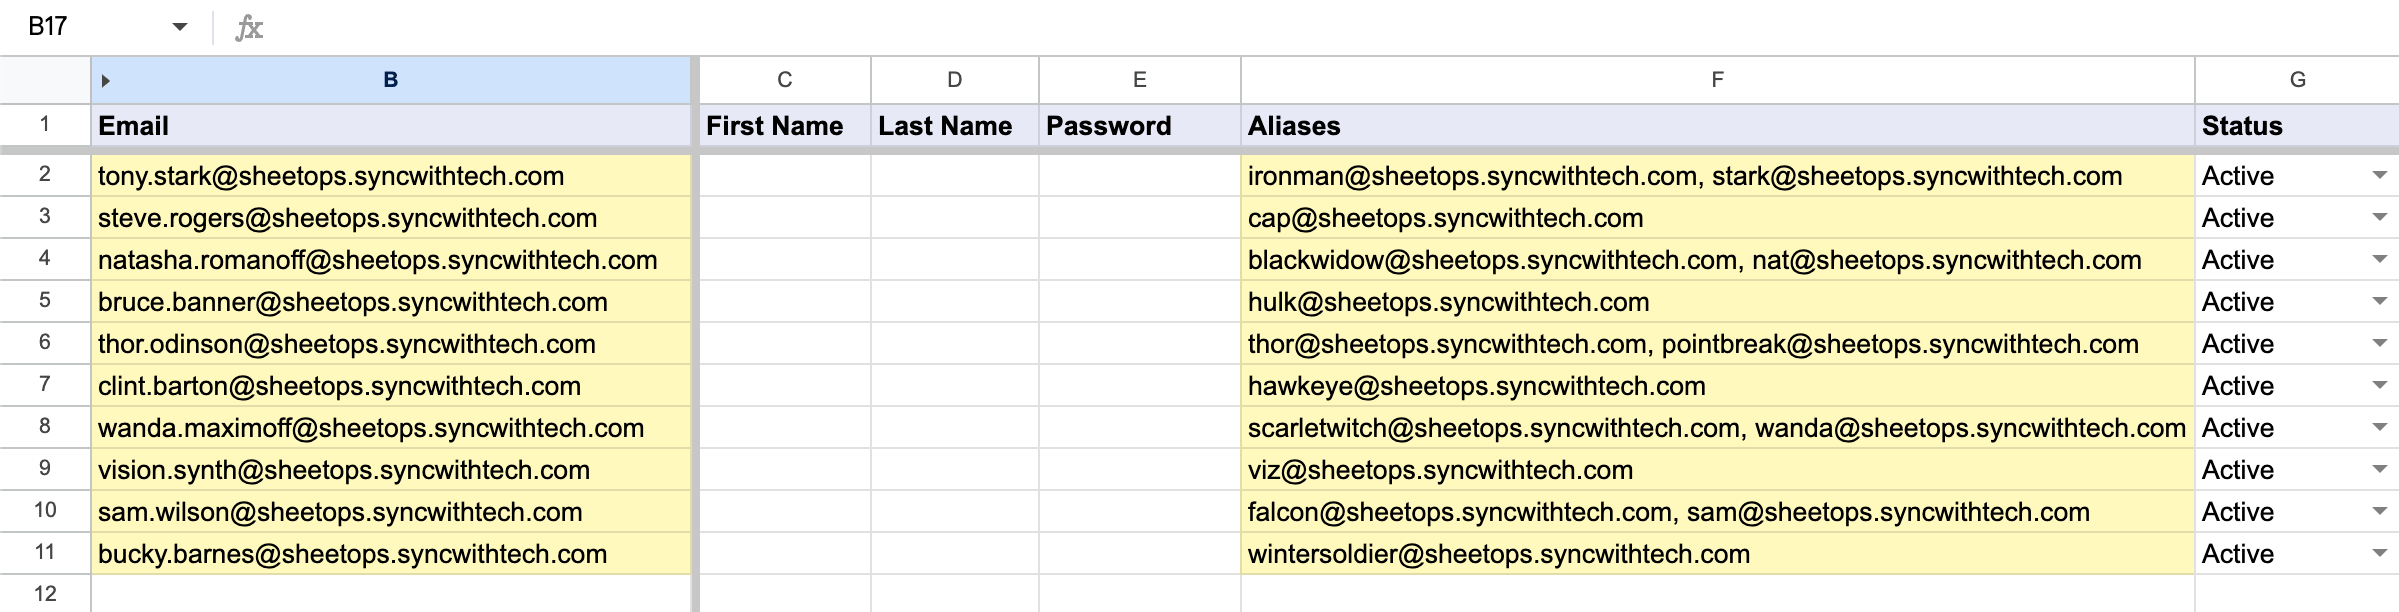
In SheetOps, user email aliases are managed via the Aliases column. SheetOps uses a diff-syncing model to process alias changes:
- Whatever email addresses are present in the Aliases cell when you apply changes will become the exact, complete set of aliases for that user.
- You do not need to specify "add" or "remove" actions. Simply edit the list so it reflects the desired end-state, and SheetOps will compute the difference (diff) between your spreadsheet and Google Workspace.
- Any email aliases added to the cell that were not there before are inserted.
- Any email aliases removed from the cell that were previously there are deleted.
- Untouched email aliases are left unchanged.
Google Admin Console vs. GAM CLI vs. SheetOps
To help you choose the best workflow for your needs, here is a comparison of the primary methods for bulk user email alias updates, including Google's native options and command-line tools like GAM CLI:
| Feature | Google Admin Console | GAM CLI (e.g., gam add alias) | SheetOps (Spreadsheet) |
|---|---|---|---|
| Workflow | Manual addition/deletion per user profile in Admin Console | Run CLI commands (like `gam create alias`) or loop through CSV scripts | Edit comma-separated lists in Google Sheets and tick checkboxes to sync |
| Skill Curve | Low (basic admin dashboard interface) | High (requires terminal familiarity, API setup, and scripting) | Low (leverages standard spreadsheet edits and mouse actions) |
| Visual Staging | None (updates apply immediately or via blind CSV processing) | None (commands run immediately without a visual review state) | Yellow highlights flag pending changes before committing them |
| Execution Logs | Checked via email reports or Admin Console Tasks dashboard | Standard terminal stdout/stderr logs | Real-time status updates directly in the sheet's Change Log column |
How to Bulk Add and Delete User Email Aliases
1. Prepare Your Spreadsheet Template
To target and update users, you have two options to bring them into the sheet:
- Fetch with Filters: Go to Extensions → SheetOps → Users, select Fetch with Filters, and choose your target criteria (such as a specific organizational unit) to bring existing users to the sheet. For a detailed guide on how to filter workspace users, refer to the filtering guide. Once imported, you can manage their email aliases.
- Just the Sheet: Go to Extensions → SheetOps → Users, select Just the Sheet, and click Create Sheet to generate a clean template. You can then simply input the user email and their target aliases before checking the Apply Changes checkbox.

[!NOTE] If the Aliases column is not visible in your sheet, go to Extensions → SheetOps → Choose display fields, select the Users tab, check the box for Aliases, and click Save.
2. Input Email Alias Changes
In the user sheet, locate the Aliases column:
- To add aliases: Append the new email addresses to the comma-separated list (e.g.
[email protected], [email protected]). - To remove aliases: Simply delete them from the comma-separated list.
- To clear all aliases: Make the cell completely empty.
- Edited cells will automatically highlight yellow.
[!IMPORTANT] Whatever email addresses are listed in the Aliases cell will be the exact set of aliases that the user has after applying changes. SheetOps will automatically add any new aliases and remove any deleted ones to match this final list.
[!TIP] When you enter data, SheetOps automatically applies a yellow background to the edited cells. This visual indicator helps you keep track of pending changes before you push them.
3. Select Multiple Checkboxes at Once
Instead of checking every single box one by one, you can check many of them all at once!
- Click on a checkbox cell in the Apply Changes column.
- To select the other cells:
- Click and Drag: Hold your mouse button down and drag your cursor over the other checkboxes.
- Shift + Click: Press and hold the Shift key on your keyboard, then click the last checkbox cell in your list. This highlights all the cells in between!
- Press the Spacebar on your keyboard to instantly check all the selected boxes at the same time.
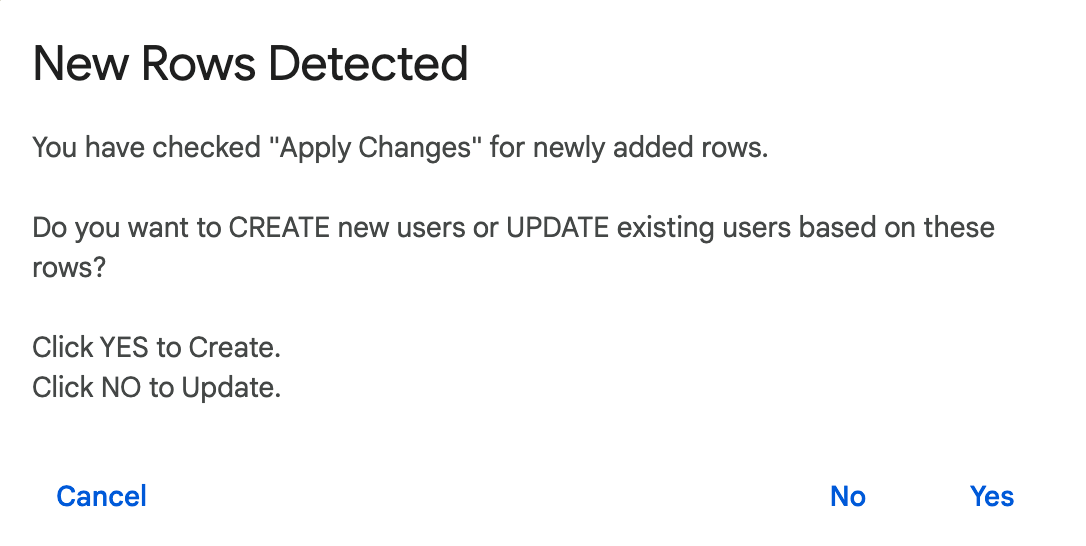
4. Confirm the Update in the Interactive Dialog
Once you press the Spacebar, an interactive dialog will pop up asking: "Do you want to CREATE new users or UPDATE existing users?" Select No (Update) to tell SheetOps to start updating your existing users' email aliases.
5. Review the API Result and Change Logs
As SheetOps goes to work updating the users in the background:
- The yellow highlights will disappear as each row is processed.
- The Change log column (the last column on the right) will show the status:
- ✓ Updated (highlighted in light green) with a green checkmark when the update succeeds.
- ✗ error_message (highlighted in light red) if something goes wrong, explaining the error.
Troubleshooting & Best Practices
- Alias Domain Verification: Any email alias you add must use a domain that is verified and active on your Google Workspace account. For details, refer to Google's guide on adding domain aliases.
- Uniqueness Requirements: An email alias must be unique. It cannot be assigned if it is already in use as a primary email, alias, or Google Group email by another entity in your Google Workspace domain.
- Google Workspace API Limits: Google Workspace enforces a maximum limit of 30 email aliases per user account. If you list more than 30 aliases in the comma-separated cell, Google's API will return a validation error. See Google's official user alias limits for more details.
Frequently Asked Questions (FAQ)
Can I bulk add email aliases using domains different from the primary domain?
Yes! As long as the secondary domain or alias domain is verified in your Google Workspace Admin Console, you can create aliases using it (e.g. [email protected] for a user whose primary email is [email protected]).
How does SheetOps handle alias deletions?
SheetOps uses a synchronization mechanism. If you delete an email alias from the comma-separated list in the spreadsheet, SheetOps detects the deletion relative to the baseline data and calls the Google Workspace Admin Directory API to remove that specific alias when you apply the changes.
What is the difference between an email alias and a Google Group?
An email alias belongs to a single user mailbox; all mail sent to the alias goes to that user. A Google Group (mailing list) distributes incoming mail to multiple users who are members of that group.
Last updated: June 18, 2026

Ready to manage Workspace at spreadsheet speed?
Install SheetOps from the Google Workspace Marketplace today and start performing bulk directory updates, onboarding, and audits directly inside Google Sheets.