Bulk Delete Google Workspace Users from Sheets

SheetOps Google Sheets Add-on
This guide is for the official SheetOps add-on. Install it to manage Google Workspace at spreadsheet speed.
Deprovisioning offboarded employee accounts permanently in the Google Admin Console requires manual multi-step confirmations per profile. SheetOps streamlines bulk Google Workspace user deletion in Google Sheets while providing a 20-day safety window for recovering recently deleted accounts.
Quick Answer: To bulk delete Google Workspace users with SheetOps: export your users to a sheet, change their Status to Deleted, select the Apply Changes checkboxes, and execute the update. This immediately revokes login access and deletes their Workspace data after a 20-day restorable window.
Understanding User Deletion Mechanics
Changing a user's status to Deleted in the spreadsheet instructs SheetOps to make a delete API call to the Google Directory API's users.delete (historically Users.remove()) method. Additionally, SheetOps can query Google Workspace's "recently deleted" bin and perform restorations using the users.undelete endpoint within a 20-day window.
Google Admin Console vs. GAM vs. SheetOps for User Deletion
While you can delete users manually in the Google Admin Console or write terminal scripts using GAM, SheetOps provides a safer, faster way to manage deletions at scale:
| Criteria | Admin Console | GAM CLI | SheetOps |
|---|---|---|---|
| Bulk Operations | Manual deletion in console or rigid CSV uploads | Scripted command-line commands | Familiar copy-paste and fill-handle drag in spreadsheets |
| Safety Net | None (deletions are immediately executed) | None (deletions are immediately executed) | Live validation and visual staging (highlighted in yellow) |
| Restoration | Manual console search (user-by-user) | Requires running another CLI command | Fetch deleted users, toggle status to 'Active', and apply |
| Change Tracking | Admin audit logs in console | Command line output logs | Real-time status updates directly in the sheet's Change Log column |
How to Bulk Delete Google Workspace Users
1. Prepare Your Spreadsheet Template
To target and update users, you have two options to bring them into the sheet:
- Fetch with Filters: Go to Extensions → SheetOps → Users, select Fetch with Filters, and choose your target criteria (such as a specific organizational unit) to bring existing users to the sheet. For a detailed guide on how to filter workspace users, refer to the filtering guide. Once imported, you can delete accounts as needed.
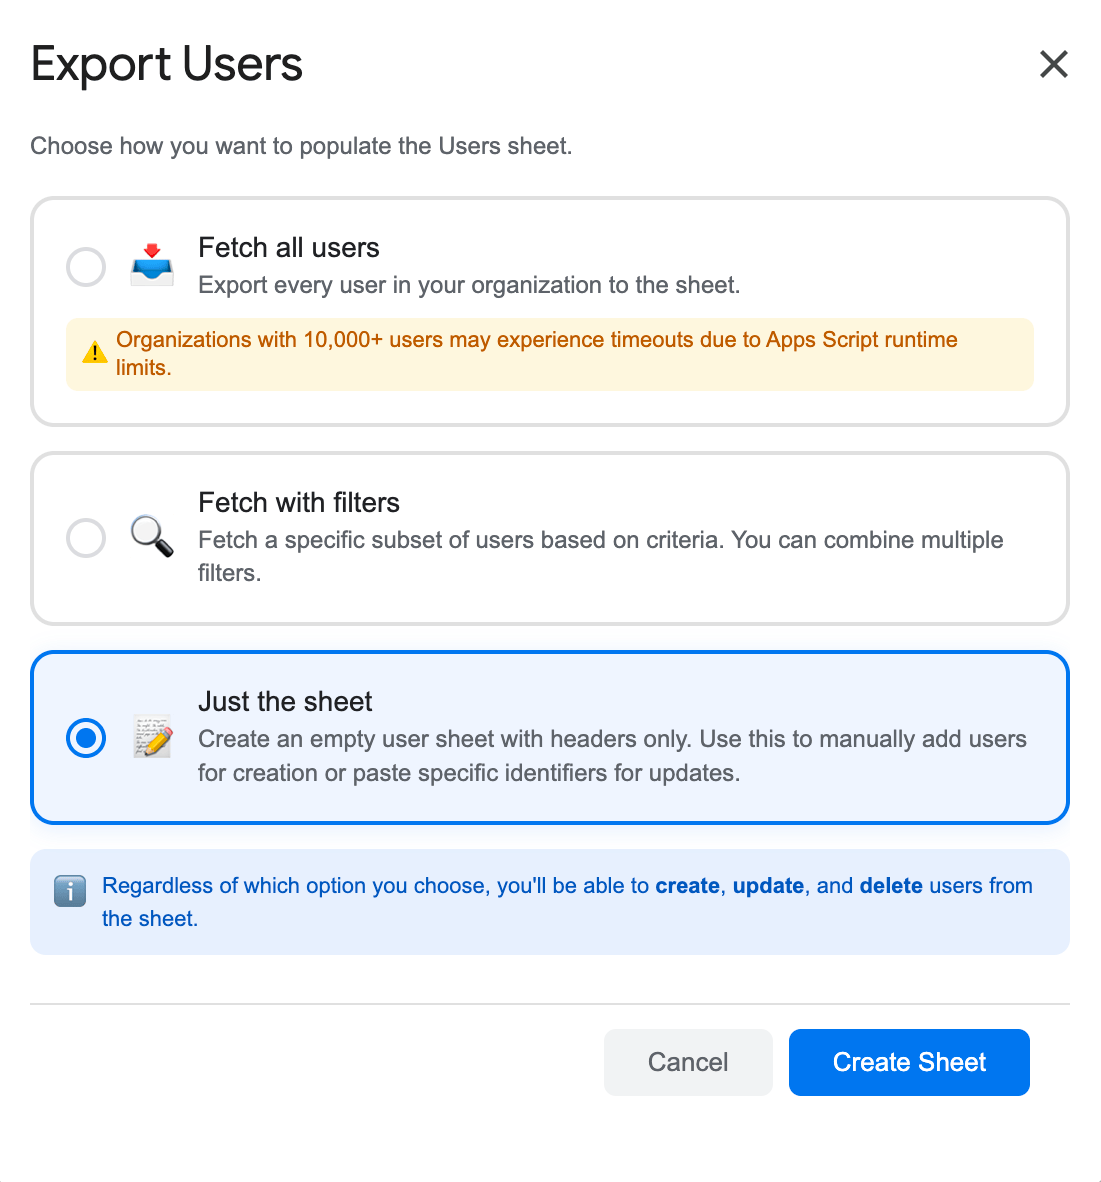
- Just the Sheet: Go to Extensions → SheetOps → Users, select Just the Sheet, and click Create Sheet to generate a clean template. You can then simply input the user email and change their status.
2. Modify Status to Deleted
In the user sheet, locate the Status column (the third-to-last column):
- For the first user you want to delete, select Deleted from the dropdown menu.
- Bulk Action Tip: Instead of manually selecting the dropdown for every single row, you can select the "Deleted" value on the first row, click and hold the fill handle (the small square in the bottom-right corner of the cell), and drag it down over the other user rows. This instantly copies the Deleted status across all selected rows.
- All cells with pending data or updates will highlight yellow.
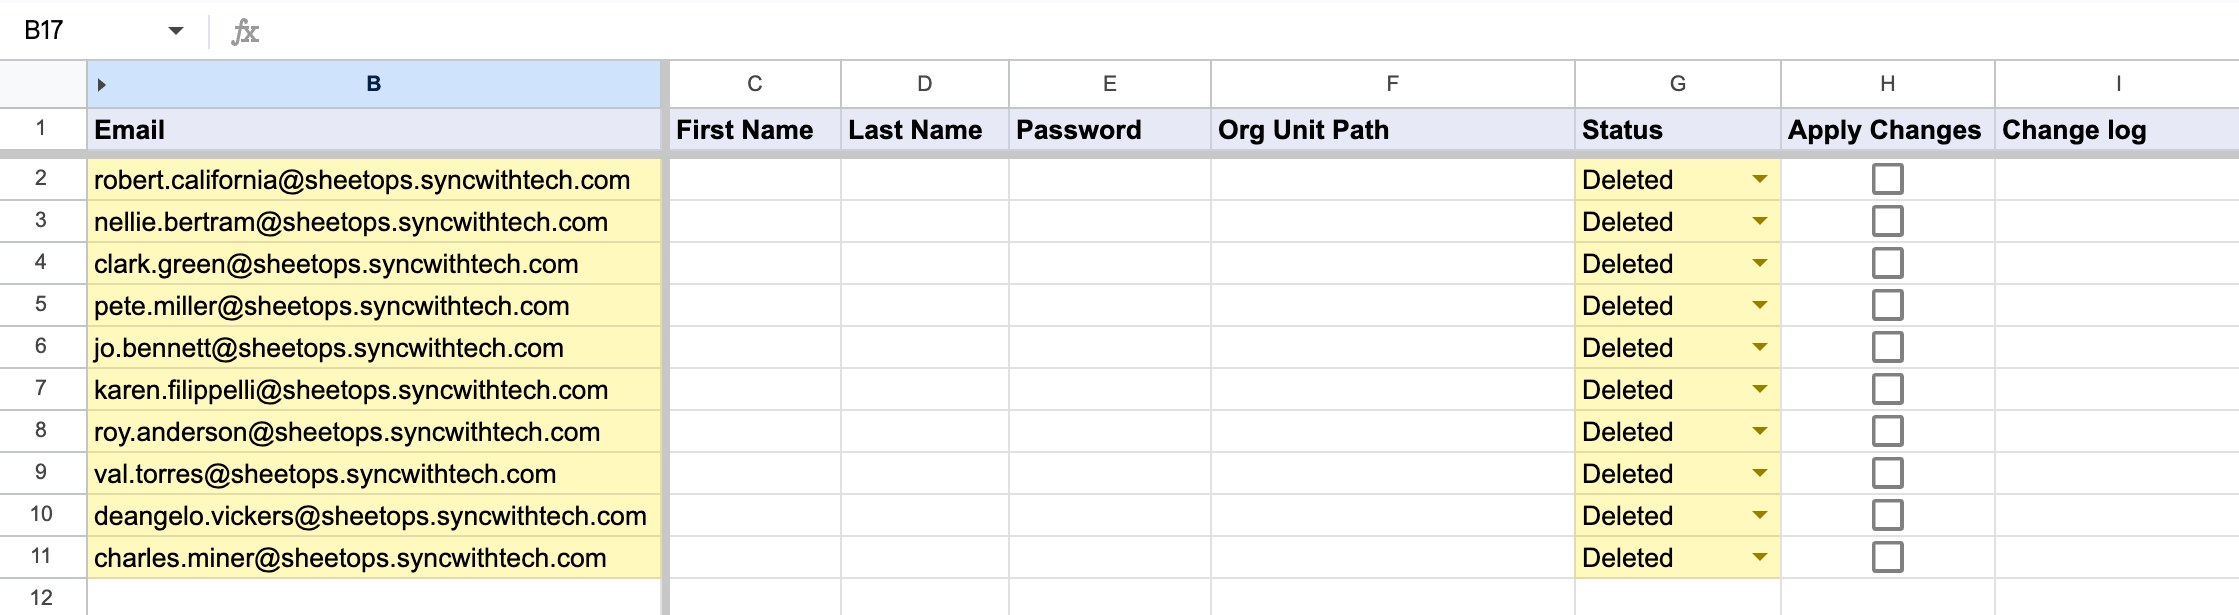
When you enter data or select dropdown choices, SheetOps automatically applies a yellow background to the edited cells. This visual indicator helps you keep track of pending changes before you push them.
Deleting a user permanently deletes all of their Google Workspace data (emails, drive files, calendars, etc.) after 20 days. Ensure you have transferred or backed up their Google Drive files before deleting the account.
3. Selecting Multiple User Accounts for Bulk Deprovisioning
To execute batch account deprovisioning without checking boxes individually:
- Click the first checkbox cell inside the Apply Changes column alongside your designated deleted user row.
- Highlight all target user account rows:
- Mouse Drag: Press and hold your left mouse button down while dragging across the checkbox cells.
- Shift + Click: Hold down Shift and click the final user deprovisioning row in your table.
- Tap Spacebar to check all selected user deletion checkboxes at once.
4. Confirming Permanent User Account Deprovisioning
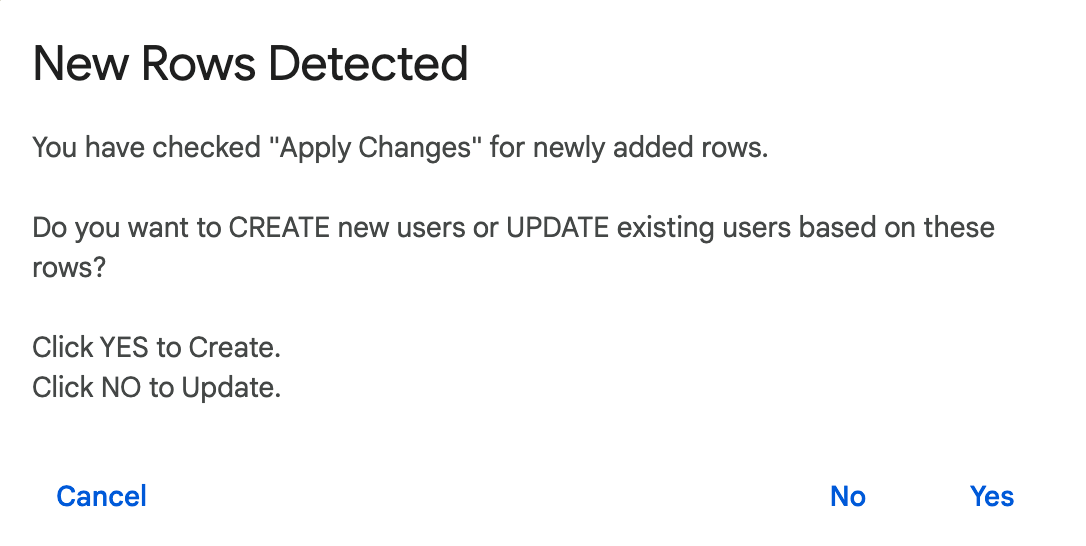
Upon hitting Spacebar, an interactive dialog asks for operational confirmation. Select No (Update) to trigger account deprovisioning via the users.delete API method, immediately revoking user authentication tokens while retaining restorable bin status for 20 days.
5. Monitoring Deprovisioning Audit Trail and Deletion Logs
As SheetOps processes account deletion tasks in the background:
- Pending yellow delta cell highlights clear line-by-line upon API execution.
- The Change log status column records immediate API feedback:
- ✓ Deleted (highlighted in soft green) when the user account is successfully moved to the 20-day deletion bin.
- ✗ error_message (in soft red) if insufficient privileges or super-admin protection rules block user deletion.
Video Tutorial
Watch this video guide to see how to bulk delete and restore users in Google Workspace using SheetOps:

How to Undelete or Restore Deleted Users
Google Workspace keeps deleted user accounts in a restorable state for 20 days after deletion. You can search for and restore these accounts in bulk using SheetOps.
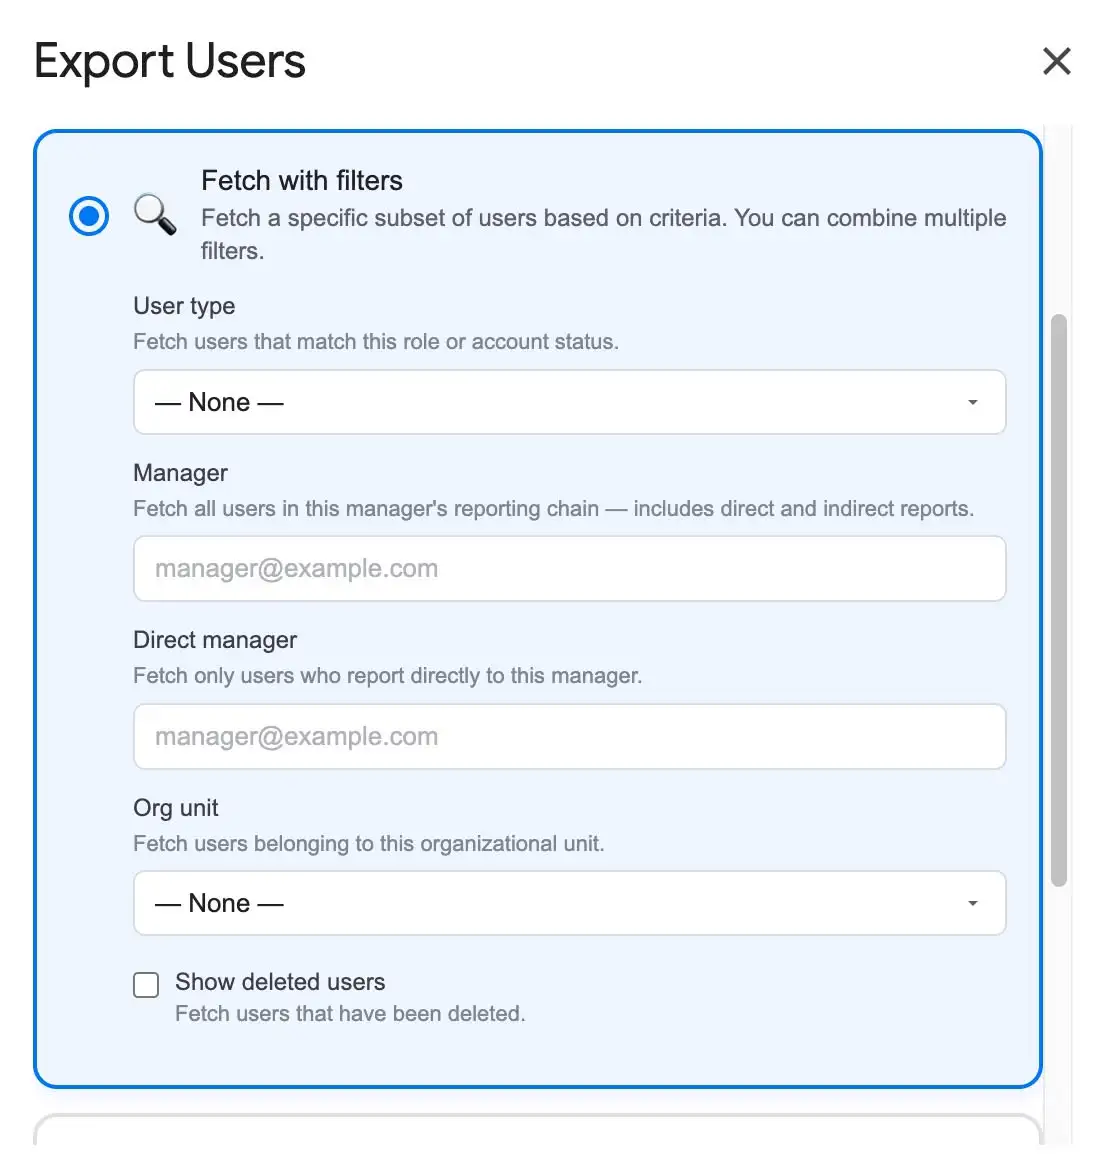
- Go to Extensions → SheetOps → Users and select Fetch with Filters.
- Tick the checkbox for Show deleted users and click Fetch. This loads recently deleted users into the spreadsheet and sets their Status column to
Deleted.
- In the status dropdown for the deleted user, change their status from
Deletedback toActive(orSuspended/Archived). You can also use the drag-to-fill handle to restore multiple users in bulk. - Check the Apply Changes checkbox for those rows (using the multi-select Spacebar trick for bulk operations).
- Click apply, and in the interactive confirmation dialog, select No (Update).
- Once complete, the Change log will display ✓ Updated once successfully restored.
Troubleshooting & Best Practices
- 20-Day Limit: If a user has been deleted for more than 20 days, their account is permanently deleted and cannot be restored via the API or SheetOps.
- Licensing: Re-enabling a user requires an available Google Workspace license. If your organization has run out of licenses, the restore operation will fail with an error log in the sheet.
- Data Retention & Transfer: Deleting a user blocks login access and eventually deletes data. If you wish to save on licenses but keep data Vault-searchable, use Archive instead of Delete. For more details on data transfer, see Google's Data Transfer tool.
- Email Aliases & Forwarding: If you want to prevent incoming mail bounce messages, delete the email aliases or set up routing rules before deleting.
Frequently Asked Questions (FAQ)
Can I transfer Google Drive files automatically during bulk deletion?
No. Google Directory API does not support automatic data transfer parameters during bulk user deletion. You must transfer Drive ownership or set up a backup prior to deleting the user, either manually or via Google's Data Transfer tool in the Admin Console.
What happens if I restore a user but do not have enough Workspace licenses?
The restore operation will fail. Google Workspace requires an active license to assign to the restored account. If your domain's licensing pool is empty, the API will throw an error and SheetOps will log the failure in your spreadsheet's 'Change log' column.
Can I see who deleted a user in SheetOps?
SheetOps does not store deletion history. However, all deletions performed via the Admin Directory API are logged in your Google Workspace Admin Audit Log in the Google Admin Console.
Last updated: August 6, 2026

Ready to manage Workspace at spreadsheet speed?
Install SheetOps from the Google Workspace Marketplace today and start performing bulk directory updates, onboarding, and audits directly inside Google Sheets.